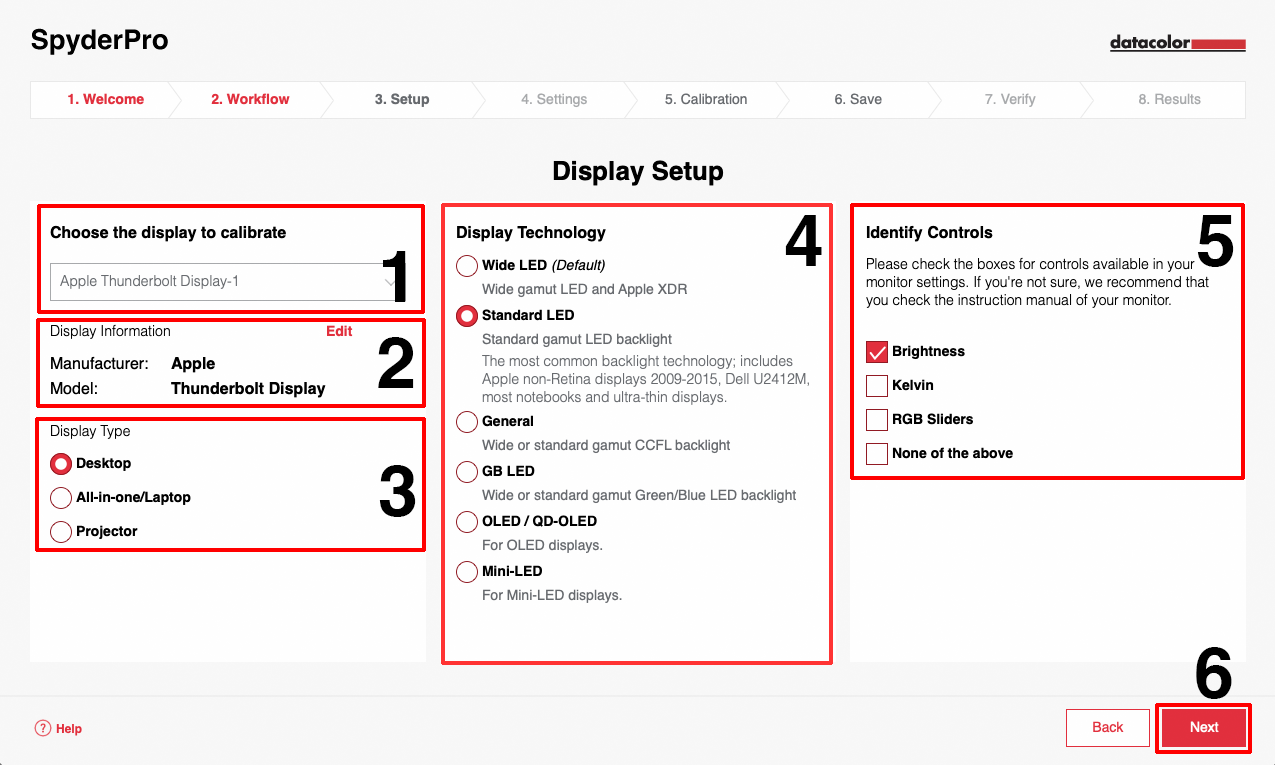
Setup
Display configuration and Setup
SpyderPro:

Spyder:
-
Choose Display
- If you have multiple displays connected to your machine, please ensure to choose the one you want to calibrate inside this drop-down.
- The application window will automatically change to the display you activate.
-
Make and Model
- By choosing which make and model your display is, you will help us to optimize our database of correction curves applied to different display types when calibrating them.
- If you accepted to share your calibration data with Datacolor (you can check in the Preferences.), you will help us to improve the calibration for this particular display type.
- Comparing all the calibration data (and only the calibration data) coming in from our users, we can work to perfect our calibration for each particular display model with every software update.
- Make
Please select the manufacturer of your display using this dropdown. If your make isn't listed, please select "Other" and type in the manufacturer of your monitor.
- Model
Please type in the model identification as labelled by the manufacturer on the backside of your monitor or on the bottom side of your laptop or projector. You can also check the instruction manual to get this information.
You can also modify the model name for a more convenient identification. e.g. "xy monitor right" and "xy monitor left".
-
Display Type
- Please select the type of display device you want to calibrate with Spyder / SpyderPro:
- Desktop
Desktop Monitors are LCDs connected to a standalone computer. Please also choose this option to calibrate all-in-one systems where the display and the computer are designed as one device. (For example an iMac)
This will also calibrate desktop computers with LED technology and Retina displays.
- Laptop
To calibrate your laptop display, you have to choose this option, as this will optimize the calibration for displays that are not only used at your workstation, but also on the go.
This will calibrate laptop displays with LED technology and with Retina displays.
- Projector (SpyderPro only)
Choose this option if you want to calibrate your projector to have reliable color when presenting your pictures and designs on a projection screen.
You'll get a tutorial on how to place your Spyder correctly to calibrate your Projector during the calibration process. Please also have a look at this Spyder support article.
-
Display Technology
- Select the appropriate backlight type for the display you want to calibrate.
- If you do not know the type of backlight, please consult the displays manufacturer or manual for more details.
- If you cannot find that information, we recommend using the “Wide LED” backlight type.
- IMPORTANT information for existing SpyderPro users:
The function High Brightness has been removed as the Spyder supports up to 3000 cd/m^2 (nits) and the SpyderPro up to 12000 cd/m^2 (nits) across all display technologies. Just select the display technology that best matches your display.
You will see an information you can disabled from showing again:
- Please find more detailed information on the different display technologies in this support article.
-
Identify Controls
- It's important to set the Controls of your display device as close as possible to the calibration targets. Please select which of these controls are available in your monitor settings by activating the checkboxes. If you're not sure, we recommend that you check the instruction manual of your monitor.
- Brightness
The Brightness Control normally offers a setting of a value between 0 and 100 - this will be a percentage value.
Be sure you set the Backlight Control to the Factory Defaults and set the Brightness through the Brightness Control, as this offers smoother steps.
- Kelvin Presets
This setting might also be named as "Color Temperature" or "White Point". On some displays you can set a Kelvin value, on others you can choose between different temperatures (warm, cold, etc.). Both count as Kelvin Presets Control. Please activate this checkbox if you have this option in your monitor’s OSD settings.
- RGB Sliders
If your monitor offers you Controls to set each RGB channel manually, please mark this option. The software will guide you through the optimal setting if necessary. This option will only appear if you activated it in the software preferences.
Continue to Calibration Settings
Do you need additional help?
Please submit a support request (ticket) here